One of our considerations when looking for a 5ver was that it had to have enough space for a workstation. With a business that relies heavily on our ability to use high end computers, a comfortable place to work was essential.
The bunk room on a Sandpiper 365 SAQB is very spacious.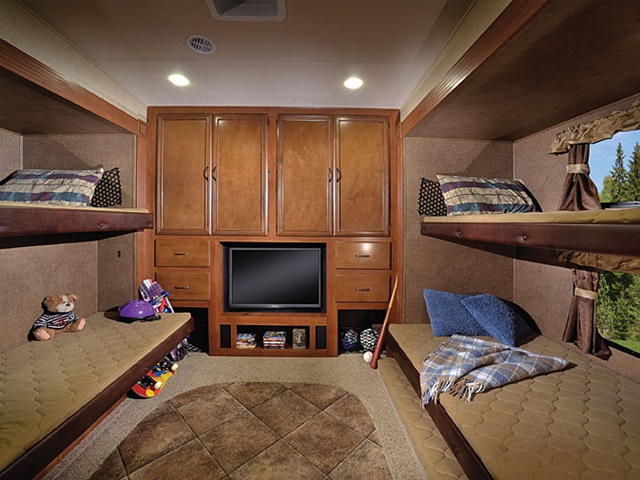
Four bunks, with a fifth pull-out mattress for the floor. We have two kids who, at first, enjoyed the luxury of picking which bunk they wanted each night. During the day, they are home-schooling with Mom at the kitchen table, so that leaves the bunk room available for me to work in.
The first “solution” was to set up a card table at the end of the room, in front of the TV. The table was stored on top of the fifth mattress, under the right bunk. This worked okay, but was only practical for a laptop. My main problem when working is that I like to “spread out”! The card table was not working.
Next, I tried a fold-out white plastic 5’ table from Sam’s Club. It stowed away neatly, just like the card table did, and had a lot more surface room available.
After setting-up, and tearing down this table a few times, it became obvious that this was not an ideal solution. In addition, I wanted to bring my 27” high-end iMac on board so I could edit video – FAST! We brought it on-board for a four-day excursion, stowing it in the main bedroom closet, but it was so impractical to set-up on a temporary table.
Sitting there, in the bunk room one day, I came up with a solution. So, here it is – step-by-step.
We had already claimed the bottom bunk on the right side for the dog-crate, third mobile a/c unit (with external venting), and school supplies. The bunk’s mattress was removed, and replaced with durable carpet.
 The left side bottom bunk protrudes into the room by about 18” more than the bunk above, as it is placed behind the back wall of the outside kitchen. For this reason, it is hinged so that it can be stowed up when the slides come in. How necessary that is became evident when my wife closed the slides with me in one of the bunks! (I volunteered). The gap between the bottom bunks, with the left bunk in the stowed position was only 10”.
My idea was to mount this bed so that it was at desk height. My problem was that it would protrude out too far when stowed (up against the top bunk), and it still did not solve the problem of what to do with a 27” iMac.
We thought about mounting the iMac where the TV is, but that caused several problems. The main problem is that it is way too low. Then, we need a standard flat screen with multiple inputs for DVD player, Wii, etc. for the kids… and… do I really want my kids messing around with my iMac? Uh – no.
Step 1 – Cut the Bunk in Half!
The bunks themselves are made from an aluminum frame. The frame is extremely light. On the top side, it is covered with a 1/2” sheet of board. The bottom side is finished with a laminate sheet, while around the sides there are padded, upholstered surrounds that serve to keep the mattress in place.
Cutting through laminate, aluminum, and 1/2” board is not easy. I had to do it in one to be sure I had cut them all exactly the same, and I had to cut through the laminate with the frame as it was glued to it.
After a trip to Lowes, we had re-fitted our circular saw with a metal cutting disc.
If I could only communicate the noise/smoke/debris that was produced by this process! We honestly thought we were going to get thrown out of the park. Probably should have! On reflection, it is probably best to do projects like this somewhere other than the park. It was all done in 20 minutes, so not too bad.
Step 2 – Discover New Storage!
I wanted to know what exactly was under/behind the bunk, for several reasons. I needed an extra electrical outlet for the computer/audio equipment, and I needed to know what structure there was behind the paneling so that the new desk would be secure.
After peeling away the laminate board from the “step” underneath the bunk, this is what I found:
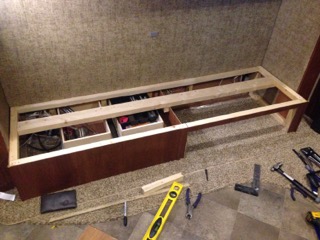
The drawers for the outside kitchen, with a huge, unused space next to them. This space revealed the back of the outlet to the outside refrigerator. Now I had my source of 120v.
We could not waste this space, and could not believe that a drawer to the inside had not been thought about by the designer of the RV. I cut a simple hole out of the paneling and used the off-cut to separate the inside storage space from the outside drawers. Now our son has a place to stow his storage tub full of Legos!
This de-construction also revealed the framing for the walls, so now I could mark the mounting points for the desk.
Step 3 – Re-use the Hinge
The two halves of the bunk could now be joined in the center by the hinge that used to be on the back. I flipped one half of the frame around so that the exposed aluminum frame could rest against a solid surface when flipped down.
We must have put these halves together, and taken them apart at least a dozen times as we fitted the pieces, and re-surfaced the desk top.
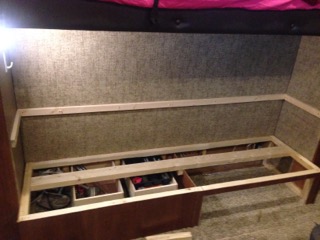
Step 4 – Install Desk Support.
 The general idea for the desk provided an answer to our problem of where to store the iMac when we are travelling. With the back half of the desk permanently affixed to the walls, only the front half flips up. This also solved the problem of how to avoid the protruding bunk from smashing up against the opposite bunks
when the slides came in. The front half perfectly flips up under the top bunk.
With this in mind, we had to install 2” x 1” rails around the walls so the rear part of the desk could be supported.
Step 5 – Power!

 An “Old Work” outlet plate was recessed into the wall cavity, and a cable run from the outside refrigerator outlet to it. Worked out great because this outlet was actually the last one in that circuit.
Made sure to flip the breaker on this circuit, and tested it to be sure it was off before proceeding.
 Step 6 – Install Rear Half
With the rear half of the desk in place, I attached corner braces around the supports to join the desk top to the 2” x 1”.
This half of the desk was measured out before cutting so that the hinge would sit just a little back from the inside edge of the slide.
Step 7 – Install Front Half
Joining the two halves of the desk with the hinge completed the basic structure of the desk.


But, it also revealed a problem.
I had looked up the specs on the iMac, and the dimensions said that with the base it stood 18” high. I had allowed 18.5” between the desktop and the top bunk, which was about all that I could do considering the minimum leg room needed under the desk. Then I went back to our storage unit and brought my iMac back to the RV to discover that it stands 20” tall. It would not fit under the top bunk. A few British cuss words flooded to the back of my teeth!
One thing I live by is the belief that there is always a way. I just have not thought of it yet!
As I sat there and pondered my plight, I thought about what it would take to lift the top bunk another 2”. Nope, that was not going to happen. Then I thought about dropping the desk 2”. Not doing that either. I would have to squeeze my legs under it, and it would mean re-doing the supports.
Step 8 – Mount the iMac
 The top of the desk was to be covered with a thin layer of smooth hard board, to which I could stick a laminate finish. The picture to the left shows how the base of the iMac was inserted into the frame of the desk, lowering it the required two inches.
Extra support was required underneath, as the only thing for it to sit on was the thin laminate board. I purchased a length of aluminum corner bracing from Lowes and screwed it into the aluminum bed frame, spanning the gap where the base of the iMa c sat.
This provided the required support. In addition, I used another piece to clamp down on the horizontal base of the iMac so that it does not move – at all! To protect the base I used double sided foam tape between the brace and the base (I am a poet and I don’t know it!).
Step 9 – Laminate the Desk
Actually, I did not use “real” laminate. I used a leather effect shelf paper with a peel off back. It is easy to work, if you are patient (sometimes I am).


The edges of the desk needed to be covered. On a trip to Walmart I discovered an amazing variety of Duct Tape. One of the decorative rolls had a cork finish. This is what I used to finish out the edges of the desk
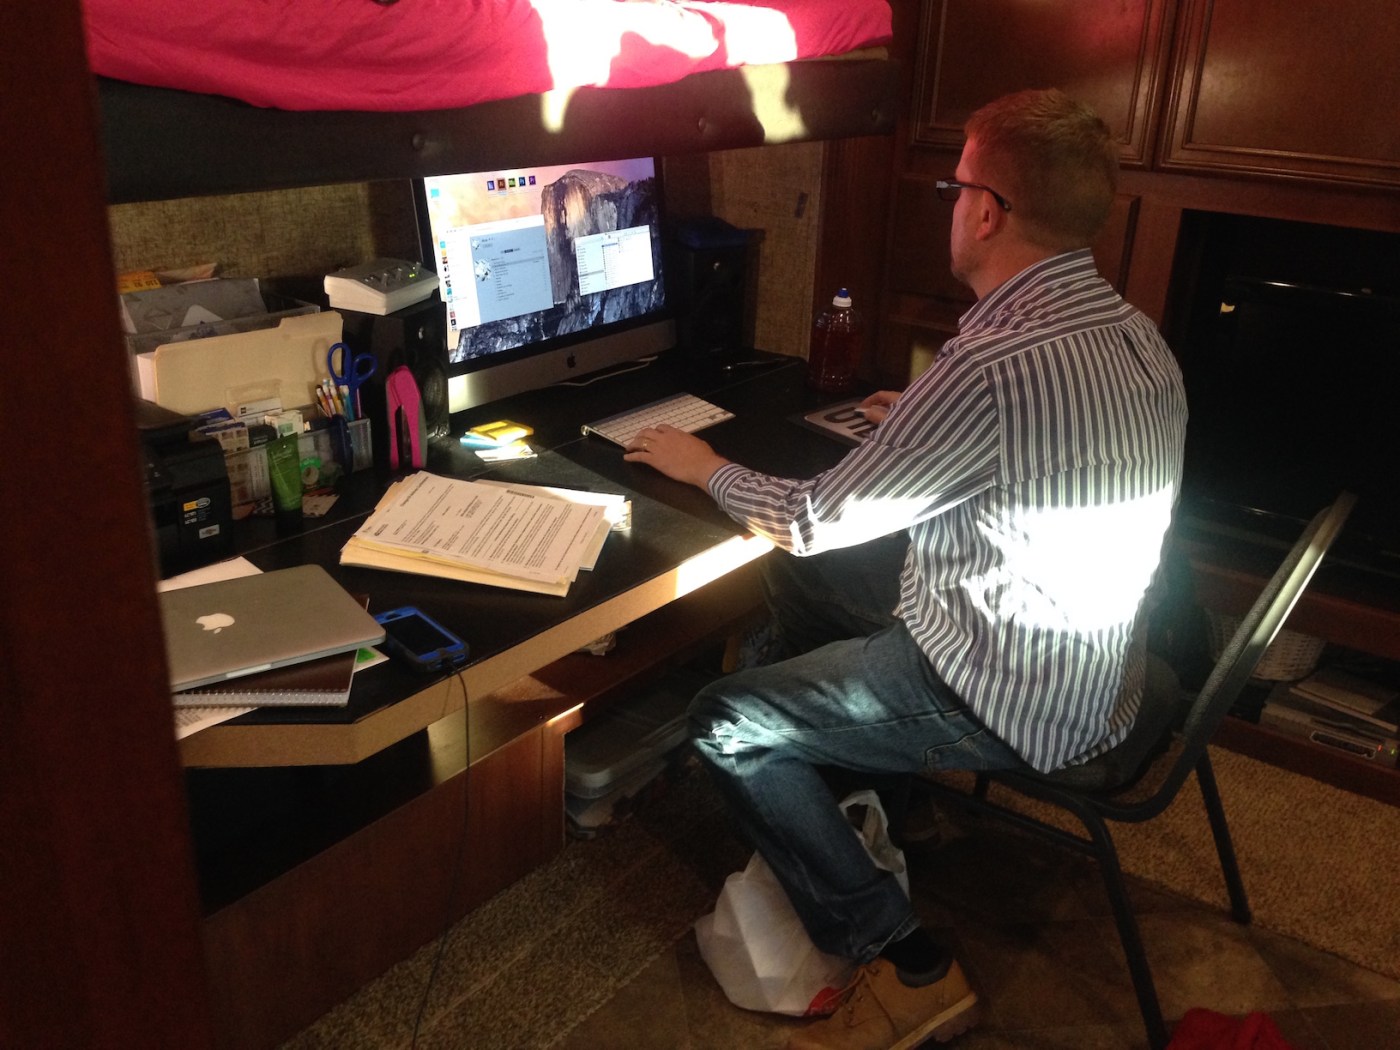
Step 10 – Get to Work!


The finished space provides a secure place to stow our computer equipment (Printer, Speakers, iMac) and stationary. When the front of the desk flips up the equipment is effectively “boxed in” and so is protected when travelling. When the kids are using the room, all of the gear is out of sight (and harms way!). Emily can get up on her bunk using a two-step ladder.


Underneath the desk we have the extra storage cubby for Tyler’s Legos, and a large shelf where we store our file boxes.
It was great to find a solution that cured all of our issues, and provided some extra storage space at the same time!

